The Challenge: 3D Graphics on a Microcontroller
🤖 Disclaimer: AI has been involved in writing this article
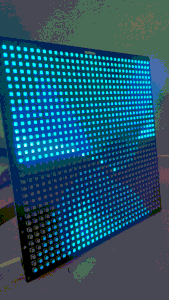
When I first laid eyes on Pimoroni’s Cosmic Unicorn — a gorgeous 32×32 RGB LED matrix powered by a Raspberry Pi Pico W — I knew I had to push its limits. Sure, scrolling text and simple animations are fun, but what about real 3D graphics? What about ray tracing?
The problem was obvious: ray tracing is computationally expensive, and the Pico W, while capable, isn’t exactly a GPU powerhouse. But that’s where the fun begins.
Ray Marching
Instead of traditional ray tracing with triangle meshes, I turned to ray marching with Signed Distance Fields (SDFs). This technique, popularized by legends like Inigo Quilez and the demoscene community, uses mathematical functions to define 3D shapes.
# A sphere is just a simple distance function!
def sdf_sphere(center, radius):
    def sphere_sdf(p):
        return distance(center, p) - radius
    return sphere_sdf
The beauty of SDFs is that complex scenes can be built by combining simple mathematical primitives. Want organic, flowing shapes? Use smooth union operations:
def op_smooth_union(d1, d2, k):
    h = clamp(0.5 + 0.5 * (d2 - d1) / k, 0.0, 1.0)
    return mix(d2, d1, h) - k * h * (1.0 - h)
This creates seamless blending between objects — perfect for that organic, fluid look.
The Two-Script Solution
My first attempt was to run everything in real-time on the Pico. The results? A slideshow running at about 2 frames per second. Time for Plan B.
Script 1: The PC Powerhouse
The first script (render_pc.py) runs on a desktop PC and does the heavy lifting:
def render_frame(current_time):
    """Render a single frame and return brightness values (0-255)"""
    frame_data = []
    scene = create_scene(current_time)
    ray_marcher = ray_march(scene)

    # Ray march every pixel
    for y in range(HEIGHT):
        for x in range(WIDTH):
            # Create ray direction
            u = (x - WIDTH/2) * 0.12
            v = (y - HEIGHT/2) * 0.12
            view_dir = normalize(Vec3(u, v, 1.0))

            # March the ray and calculate lighting
            dist = ray_marcher(camera_pos, view_dir)
            if dist < MAX_RAY_TRAVEL_DISTANCE:
                # Hit! Calculate fancy lighting...
                brightness = calculate_lighting(...)
                pixel_value = int(brightness * 255)
            else:
                pixel_value = 0  # Background

            frame_data.append(pixel_value)

    return frame_data
This script pre-renders 60 frames of animation, each saved as a 1KB binary file containing brightness values for every pixel.
Script 2: The Pico Player
The second script (player_pico.py) runs on the Pico and focuses purely on playback:
def load_frame(frame_number):
    """Load pre-rendered frame and convert to colors"""
    with open(f"frame_{frame_number:03d}.dat", 'rb') as f:
        brightness_data = f.read(1024)  # 32×32 pixels

    # Convert brightness to colors using pre-computed lookup table
    color_data = []
    for brightness in brightness_data:
        color_data.append(COLOR_LOOKUP[brightness])

    return color_data
The key optimization here is the pre-computed color lookup table. Instead of calculating gradients in real-time, I pre-calculate all 256 possible colors once at startup:
def init_color_lookup():
    """Pre-compute all gradient colors for instant lookup"""
    global COLOR_LOOKUP
    COLOR_LOOKUP = []

    r1, g1, b1 = COLOR_1  # Dark color
    r2, g2, b2 = COLOR_2  # Bright color

    for brightness in range(256):
        ratio = brightness / 255.0
        r = int(r1 + (r2 - r1) * ratio)
        g = int(g1 + (g2 - g1) * ratio)
        b = int(b1 + (b2 - b1) * ratio)
        COLOR_LOOKUP.append((r, g, b))
The Development Experience: Preview Mode
One of my favorite features is the real-time preview mode. While developing, I can see exactly what the animation will look like:
python render_pc.py --mode preview
This opens a pygame window showing a scaled-up version of the 32×32 output, running at 30fps. I can pause with spacebar, quit with escape, and see live FPS counters. It made iteration incredibly fast — I could tweak lighting, add new spheres, or adjust animations and see results immediately.
The Scene: Organic Chaos
The final scene features multiple animated spheres with different movement patterns:
def create_scene(current_time):
    def scene_sdf(p):
        # Main pulsing sphere
        sphere1 = sdf_sphere(Vec3(0, math.sin(current_time*π) * 1.5, 0), 1.5)

        # Orbiting smaller spheres
        sphere2 = sdf_sphere(Vec3(-1, math.sin((current_time-1.2)*π) * 1.2, -1), 0.75)
        sphere3 = sdf_sphere(Vec3(1, math.sin((current_time-0.7)*-π) * 1.2, 0), 1.2)

        # Floating spheres with complex motion
        sphere4 = sdf_sphere(Vec3(
            math.sin((current_time-0.7)*-π) * 1.2,
            2.0,
            math.sin(current_time*π) * 1.2
        ), 0.6)

        # Ground plane
        plane = sdf_plane(Vec3(0, 1, 0), 0.8)

        # Smoothly blend everything together
        combined = op_smooth_union(sphere1(p), plane(p), 1.2)
        combined = op_smooth_union(sphere2(p), combined, 1.0)
        combined = op_smooth_union(sphere3(p), combined, 0.5)
        combined = op_smooth_union(sphere4(p), combined, 1.7)

        return combined
The smooth union operations create organic, flowing connections between the spheres — they merge and separate like liquid mercury.
Dual Light Sources
To add visual interest, I implemented dual light sources with different characteristics:
# Primary light - bright, sharp highlights
light_pos_1 = Vec3(
    2.0 * math.cos(light_angle),
    2.5,
    2.0 * math.sin(light_angle)
)

# Secondary light - dimmer, softer, counter-rotating
light_pos_2 = Vec3(
    1.5 * math.cos(light_angle_2),
    0.5,
    1.5 * math.sin(light_angle_2)
)

# Combine the lighting contributions
total_diffuse = diffuse_1 + diffuse_2 * 0.6
total_specular = specular_1 + specular_2 * 0.4
The primary light creates the main illumination and sharp specular highlights, while the secondary light adds fill lighting and softer highlights. As they orbit at different speeds and heights, complex shadow patterns emerge.
Color Magic: From Grayscale to Rainbows
Here’s where it gets fun. The PC script outputs grayscale brightness values, but the Pico script interprets these as positions along a color gradient. Want to change the entire mood of the animation? Just edit two lines:
# Cyberpunk vibes
COLOR_1 = (128, 0, 128)    # Purple
COLOR_2 = (0, 255, 255)    # Cyan

# Fire effect
COLOR_1 = (0, 0, 0)        # Black
COLOR_2 = (255, 100, 0)    # Orange

# Ocean depths
COLOR_1 = (0, 50, 100)     # Deep blue
COLOR_2 = (100, 200, 255)  # Light blue
The same ray-marched lighting data creates completely different moods with different color schemes.
The Upload Dance: Getting Data to the Pico
Transferring 60 files to a microcontroller isn’t as simple as drag-and-drop. I settled on Thonny IDE’s file manager:
- Generate frames:
python render_pc.py --mode render --frames 60 - Open Thonny’s file panel
- Navigate to the
animation_frames/folder - Select all 60
.datfiles - Right-click → “Upload to /”
- Wait (and pray)
Each frame is exactly 1024 bytes, so 60 frames = ~60KB total — easily fitting in the Pico’s flash storage.
Performance: Smooth as Silk
The final result? Buttery smooth 30fps playback with complex 3D lighting effects. The pre-computed color lookup table was crucial — instead of doing floating-point math for every pixel, the Pico just does simple array lookups.
# Before: Slow floating-point interpolation
r = int(r1 + (r2 - r1) * (brightness / 255.0))

# After: Instant lookup
r, g, b = COLOR_LOOKUP[brightness]
This optimization alone made the difference between stuttery 10fps and smooth 30fps playback.
Interactive Controls
The Cosmic Unicorn’s built-in buttons provide live controls:
- Brightness Up/Down: Adjust LED intensity
- A/B/C/D buttons: Pause/resume animation
- Automatic looping: Seamless 2-second cycles
Lessons Learned
1. Pre-computation is King
When working with limited hardware, move as much computation as possible to the development phase. The Pico W is perfectly capable of smooth animation playback — it just can’t render complex 3D scenes in real-time.
2. Preview Mode is Essential
Being able to see changes immediately without going through the render → upload → test cycle made development 10x faster. The pygame preview window became my primary development tool.
3. Mathematical Beauty
There’s something deeply satisfying about defining complex, organic 3D shapes with simple mathematical functions. SDFs and ray marching feel like digital alchemy.
4. File Formats Matter
Simple binary files (just raw brightness bytes) were perfect for this use case. No parsing overhead, minimal storage, and fast loading.
The Final Result
The end result is mesmerizing: multiple organic shapes flow and merge in 3D space, illuminated by circling lights that cast complex, ever-changing shadows. The 32×32 resolution might seem limiting, but at viewing distance, the LED matrix creates surprisingly convincing 3D depth.
Want to try it yourself? The complete project is available with detailed setup instructions for both the PC renderer and Pico player. Whether you’re interested in ray marching, microcontroller graphics, or just want some mesmerizing desk art, this project pushes the boundaries of what’s possible on a tiny LED matrix.
Technical Specifications
- Resolution: 32×32 pixels (1024 total)
- Frame Rate: 30fps playback
- Animation Length: 60 frames (2-second seamless loop)
- File Size: ~60KB total (1KB per frame)
- Rendering Time: ~2 minutes for 60 frames on modern PC
- Color Depth: 16.7M colors via RGB gradient mapping
The marriage of modern ray marching techniques with retro LED matrix hardware creates something truly unique — complex 3D graphics that feel both futuristic and nostalgic.
Happy ray marching! 🌟
Project Repository: Available with complete source code, documentation, and setup guides for recreating this ray marching renderer on your own Cosmic Unicorn.
Check out: https://github.com/coded-aesthetics/cosmic-unicorn-raymarcher